Firebase is awesome and I’ve used it in more apps than I can count (assuming I can only count to about 20). It has authentication, data storage, an intuitive querying SDK, and plenty of other features that most mobile app developers find themselves wanting at one point or another.
So why replace it?
I asked myself the same question many times and more than once my answer was “Don’t”. It had just about everything I needed…and then I was asked to implement End-to-End Encryption (E2EE) in a social media app. I managed to do it based on this Stack Overflow answer but the solution was complicated and if a user ever wanted to change devices they needed to encrypt their old private key, save it to Firestore, change devices, download the encrypted private key, and then decrypt it. There were a few other difficulties (some that I’m still working through) and I finally began to rethink my devotion to the god named Google.
As described elegantly by Anthony Prakash in this article:
“the @protocol is a new Internet technology created by The @ Company. The company has created a unique digital identifier known as an @sign (i.e. @alice), which lets you choose what data you want to share, with whom, and for how long”.
As a developer, what you need to know is that the @protocol, or @platform, is a database and robust privacy solution wrapped into one convenient package. Rather than requiring you to generate public and private keys yourself, each person’s @sign comes with this functionality built in. More than that, you can use the @platform to exchange data privately between the people using your apps and forget about any infrastructure worries you had before.
In this article, I want to show you how you can use the @platform to do just about everything you can do with Google’s Firestore. In short, we’ll be covering the following actions:
- Write new data
- Update existing data
- Delete data
- Read data once
- Listen for real time updates
Buckle up. You gon’ to learn today.
Setup
The setup steps are summarized here:
- Acquire an @sign (or two)
- Install the dependencies
- Create an AtClient
- Sign in using the atsign_authentication_helper package
Acquire an @ Sign
In order to do anything with @platform you’ll first need to acquire an @sign from the company’s website. In order to do any sort of testing with the @platform you’ll need two @signs. You can get them by pressing the giant button on their website or by following the link I’ve added here. Free @signs will suffice for this tutorial. Mine are @caribouillegal96 an @donkeypainful82.
Install the Dependencies
For this tutorial, you’ll need to install the following packages and perform their accompanying setups:
- https://pub.dev/packages/at_commons
- https://pub.dev/packages/at_client_mobile
- https://pub.dev/packages/atsign_authentication_helper
The only one that requires special attention is the last one. You can add it to your dependencies by directly referencing the GitHub repo:
atsign\_authentication\_helper:
  git:
    url: [https://github.com/atsign-foundation/at\_widgets.git](https://github.com/atsign-foundation/at_widgets.git)
    path: atsign\_authentication\_helper
    ref: dev\_env
Then, inside of android/gradle/wrapper/gradle-wrapper.properties, make sure you’re using the most recent gradle distribution URL. This can be a tricky bug to find so don’t forget it!
distributionUrl=https\\://services.gradle.org/distributions/gradle-6.1.1-all.zip
Create an AtClient
In order to communicate with your own personal secondary server, you’ll need to create an AtClient. In Flutter, you’ll specifically need to create an AtClientImpl which as you may have guessed is an Impl-ementation of the AtClient. The AtClientImpl class has specific methods for performing read/write actions on the @platform so most of the time you won’t actually need to interact with the verbs directly.
- AtClientImpl().put(…) = update verb
- AtClientImpl().delete(…) = delete verb
- AtClientImpl().notify(…) = notify verb
- AtClientImpl().startMonitor(…) = monitor verb
You need to run this BEFORE routing the user to the ScanQrScreen.
Sign In
With an AtClient at the ready, you can send the person to the ScanQrScreen where they will be prompted to scan a QR code or upload their key files from their device. I’m using the auto_route package for navigation so my navigation method looks like this:
await ExtendedNavigator._of(_context_)_.push_(_ Routes._scanQrScreen_,
  arguments: ScanQrScreenArguments_(_ nextScreen: HomeView_()_,
    atClientServiceInstance: atProtocolService.atClientService,
    atClientPreference: atProtocolService.atClientPreference,
  _)_,
_)_;
If all goes well, you’ll arrive at the HomeView screen with an active AtClient and an authenticated user.
Data
Before we can start slinging data around, we need to understand two things about the @platform: data structure and data storage. In this case, I am defining data structure as the actual form of the data that’s being transferred and data storage as the system by which that data get’s saved.
Data Structure
In the @ Protocol, every action you take to manipulate your data (write, update, delete) is defined by a key and a value. Keys specify the @sign the value is being shared with, the name of the value, and the @sign that is sharing the value. Values are the actual data payloads.
 ex. @bob:email@alice
Keys are used by some @platform verbs, such as update and delete, to determine how a person’s data is changed. You can find a full list of verbs here but note that most of these do not actually require a key.
Data Storage
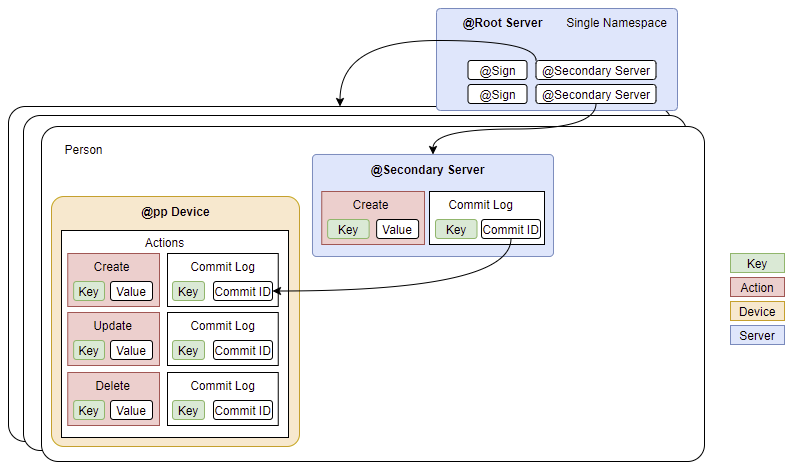
The article The @ Protocol Synchronization on the @ Company’s Medium page is a great introduction to how and where data is stored. In short, each person who has downloaded an @pp will have their own secondary server that’s used to store their data inside the @pp’s namespace. A root server sits one level above the secondary servers and is responsible for managing the directory of @signs in a given namespace.

Replacing Firestore Actions
Now for the main event. In this section, we’ll ease our way through the main actions you’d use in a typical Firebase app and explain how to replace that functionality with the @platform.
Remember, the AtClientImpl is the primary communicator between your app and the currently authenticated person’s secondary server! We’ll use it for everything!
Write and Update Data
To write a value to your secondary server, you’ll first need to specify the name of the key. In Flutter, you do this by using the AtKey class. AtKeys, as far as I understand, are syntax wrapper for the keys that move data within the @platform. Each AtKey has the following properties:
- key — The name of the key (ex. email, phone number, address, etc)
- sharedBy — (optional) The @sign of the user sharing the key
- sharedWith —(optional) The @sign that the key was shared with
- namespace — (optional)The @pp namespace that the key belongs to
So, to update a counter on the authenticated person’s secondary server, you would create an AtKey, set it’s ‘key’ property to “counter”, and then tell your AtClientImpl to update the value using the put method. The put method uses the update verb in the background which updates the value if it exists and creates it if it doesn’t.
Note that values inside the put method need to be strings.
int counter = 1;

void incrementCounter_(){_ AtKey key = AtKey_()_;
  key.key = 'counter';

  counter++;

  atProtocolService.atClientImpl.put_(_key,counter.toString_())_;
_}_
When you call the incrementCounter() function, you’ll see an output in your console that looks something like this:

Each time you change a piece of data in your secondary server, either by updating or deleting a key, a new commit is added to your commit log with a commit ID that is 1 larger than the commit before it. So if you tap the button a bunch of times, you’ll see a bunch of new commits.

Something that tripped me up early on is that an AtKey written to your secondary server with just a key does not equal an AtKey that has both a key and a sharedWith property. In other words, you can save a value for yourself and a value for a friend. That’s pretty neat.

Delete Data
Data is deleted from your secondary server using the delete() method of your AtClientImpl instance. Just like for writing, you’ll create an AtKey and pass it to the delete method.
Future_<_void_\>_ deleteKey_(_String key_)_ async _{_ AtKey atKey = AtKey_()_;
  atKey.key = key;

  if_(_sharedWith_){_ atKey.sharedWith = AtConstants_()_.atMap_\[_atProtocolService.currentAtSign_\]_;
  _}_ await atProtocolService.atClientImpl.delete_(_atKey_)_;

  if _(_key == 'one'_) {_ one = 'DELETED';
  _}_ else if _(_key == 'two'_) {_ two = 'DELETED';
  _}_ else if _(_key == 'three'_) {_ three = 'DELETED';
  _}_ notifyListeners_()_;
_}_
If you’re specifically deleting the key for someone that you previously shared it with, it will be deleted for them almost instantaneously.
Read (Your) Data Once
Now that you have data on your secondary server, let’s read it. In short, this works almost the same as writing data. You’ll create an AtKey that specifies the key name you want to read (“counter) and then use the get() method of your AtClientImpl to get that value.
Future_<_void_\>_ readCounterValue_()_ async _{_ AtKey key = AtKey_()_;
  key.key = 'counter';

  String counter = await atProtocolService.get_(_key_)_;

  print_(_'Server value: ' + counter.toString_())_;
_}_
If you run this, you should see the last counter value added to your secondary server printed in the console.
If a value does not exist on your secondary server, the get() method will return null.
Read (Their) Data Once
This all seems pretty easy and that’s because reading your own data is…easy. When you install and use an @pp, you also create a local commit log of all the changes you want to make to your secondary server. This log exists even when your unable to sync your data to a secondary server so it’s kind of like a local storage solution.
If you want to read someone else’s data, you’ll need to jump through a few more hoops (the first of those hoops being the setup). In my example, I’m going to use two different @signs on the separate devices. As @caribouillegal96, I’ll share a few AtKeys with @donkeypainful82 and vice versa. For convenience, I created a map in the AtConstants class that maps each @sign to the other one.
class AtConstants {
  ... Map_<_String, String_\>_ atMap = _{_ '@caribouillegal96': '@donkeypainful82',
    '@donkeypainful82': '@caribouillegal96',
  _}_;
}int counter = 1;

Future_<_void_\>_ incrementCounter_(_String key_)_ async _{_ AtKey atKey = AtKey_()_;
  atKey.key = key;

  _/// Share with the other sign_ if_(_shareWith_) {_ atKey.sharedWith = AtConstants_()_.atMap_\[_atProtocolService.currentAtSign_\]_;
  _}_ counter++;

  await atProtocolService.atClientImpl.put_(_atKey, counter.toString_())_;

  if _(_key == 'one'_) {_ one = counter.toString_()_;
  _}_ else if _(_key == 'two'_) {_ two = counter.toString_()_;
  _}_ else if _(_key == 'three'_) {_ three = counter.toString_()_;
  _}_ notifyListeners_()_;
_}_
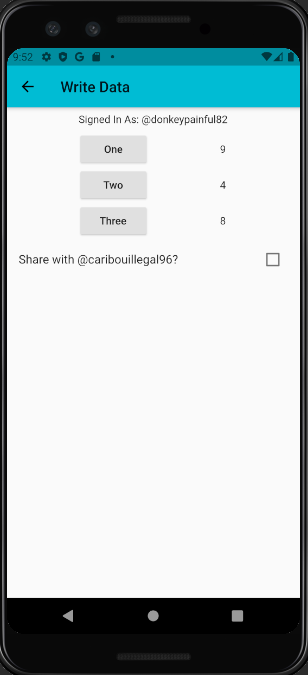
The screenshot below shows how my screen is set up. On both devices, I see a screen like this. The buttons correspond to three different AtKeys that I’m storing for each @sign (‘one’, ‘two’, and ‘three’). Every time I tap a button, a counter is incremented and the new value is written to the corresponding secondary server. If I uncheck the box before tapping the button, the new value is submitted just for me (with no sharedWith property).

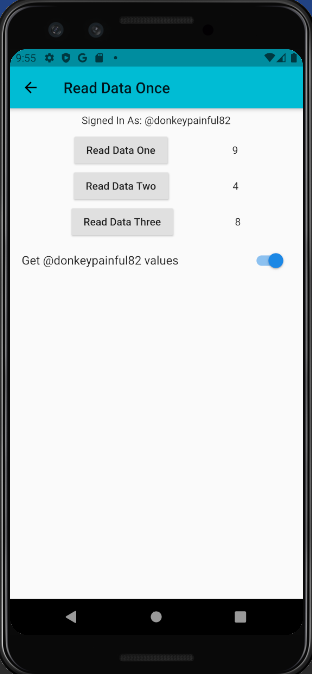
On another screen, I can read the values for either myself (the loaded @sign) or for the other person (the @sign on the other device).

Whenever I tap on a button labeled “Read Data ___”, I read a value using the get() method of my AtClientImpl instance:
Future_<_void_\>_ readCounterValue_(_String key_)_ async _{_ AtKey atKey = AtKey_()_;
  atKey.key = key;

  // Get keys shared by the other sign
  if _(_!mine_) {_ atKey.sharedBy = AtConstants_()_.atMap_\[_atProtocolService.currentAtSign_\]_;
  _}_ String serverValue = await atProtocolService.get_(_atKey_)_;

  print_(_'Server value: ' + serverValue.toString_())_;

  if _(_key == 'one'_) {_ one = serverValue ?? '-';
  _}_ else if _(_key == 'two'_) {_ two = serverValue ?? '-';
  _}_ else if _(_key == 'three'_) {_ three = serverValue ?? '-';
  _}_ notifyListeners_()_;
_}_
Listen for Real Time Updates
And the grand finale! Listening for real time database changes is an essential part of any app that allows people to interact with one another. If it’s a chat app, members of the chat should see new messages as soon as they are sent. If the app lets people like or react to content, sending real time notifications can help increase app engagement. In my opinion, responsiveness to data streams is one of the most important features an app can have.
In the @platform, real time updates are implemented in two steps. First, the person creating/sending the data needs to use the NotifyVerbBuilder to send a notification to the recipient’s secondary server. In Flutter, this VerbBuilder is hidden inside of the AtClientImpl so the actual implementation is super simple (see line 17):
Second, the user waiting for data needs to use the MonitorVerbBuilder to monitor their secondary server for any updates. Again, this VerbBuilder is built into the @platform packages so all you need are lines 2–7 below:
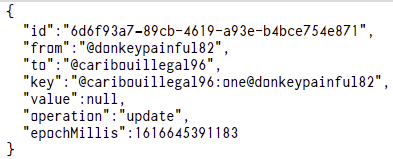
When the monitoring recipient receives a notification, it is in the form of a two-part string (“notification: jsonObject”). The structure of the jsonObject is shown here:

Each time a notification is received, you can trigger a function call, too. In my example, I am using this callback to trigger a new get() method that retrieves the newest key value. After all is said and done, you can see the newest values displayed in real time on my emulator when I send notifications from my physical device. The terminal is shown on the left to illustrate how the notifications are received.
[
At Listen GIF by jtmuller5 | Gfycat
Watch and share At Listen GIFs by jtmuller5 on Gfycat
gfycat.com
](https://gfycat.com/bewitchedsparklingdairycow)
In Conclusion
It may still be early in it’s development by the @platform will undoubtedly become a strong Firebase contender in the near future. It’s fast to set up. It’s free. It gives the people using your app privacy without you actually doing anything. And as you can see from this article, it’s capabilities as a database are rich.
Feel free to comment with questions or join the @platform Discord for more information!
At Protocol Basics Repo
All of the code for this article can be found in my at_protocol_basics repo:
[
jtmuller5/at_protocol_basics
A new Flutter project. This project is a starting point for a Flutter application. A few resources to get you started…
github.com
](https://github.com/jtmuller5/at_protocol_basics)
Resources
- The @protocol synchronization. By Muralidharan Padmanaban, Naresh… | by The @ Company | Feb, 2021 | Medium
- Data encryption & caching with the @protocol | by The @ Company | Medium
- The @protocol fundamentals. By Muralidharan Padmanaban & Anthony… | by The @ Company | Medium
Follow Flutter Community on Twitter: https://www.twitter.com/FlutterComm