Starting TypeScript
Web App
Section titled “Web App”Create a new TanStack Router project:
npx create-tsrouter-app@latestCLI App
Section titled “CLI App”npm init -yCreate a new TanStack Router project:
npx create-tsrouter-app@latestnpm init -yReleasing a Flutter app isn’t necessarily simple. There are a hundred and one things to remember related to signing your app, creating app store assets, distributing the app, and more.
First, create your upload keystore using the following command:
keytool -genkey -v -keystore ./keys/upload-keystore.jks -keyalg RSA -keysize 2048 -validity 10000 -alias uploadI usually store the signing key in the same project where it is used and add the keys directory to my .gitignore 💙.
Next, follow the steps listed here to configure app/build.gradle 💙.
Create a new file at [project]/android/key.properties and fill it in. For example:
storePassword=passwordkeyPassword=passwordkeyAlias=aliasstoreFile=../keys/my-keystore.jksFor the first release, use the flutter CLI. The flutter build command defaults to using the release build configuration. To create a release build, run the following command:
flutter build appbundleFor subsequent releases, run the Fastlanes:
cd androidfastlane internalIf you’d like to send the app to testers before it is available on the app stores, you can do so using Firebase App Distribution.
You can distribute APKs without creating an app in the Google Play console. To start, build the .apk:
flutter build apkThen, drag the APK from build/app/outputs/flutter-apk/app-release.apk into the app distribution page in the Firebase console.
You can also distribute app bundles to users, but the setup is more involved. Namely, you need to link your Firebase project to your Google Developer Console.
First, build the app bundle:
flutter build appbundleThen, upload the build/app/outputs/bundle/release/app-release.aab file to the internal testing track in the Google Play console (this is required to distribute app bundles via Firebase).
Create a new service account for Fastlane if you don’t have one already.
In the android/fastlane/Appfile file, update the json_key_file and package_name entries to match your project’s values.
| Spec | Value |
|---|---|
| Icon Size | 512 x 512 px |
| Feature Graphic Size | 1024 x 500 px |
| Phone Screenshot Size | 9:16 Aspect Ratio |
| 7-inch Tablet Screenshot Size | 9:16 Aspect Ratio |
| 10-inch Tablet Screenshot Size | 9:16 Aspect Ratio |
Screenshots must be PNG or JPEG, up to 8 MB each, 16:9 or 9:16 aspect ratio, with each side between 320 px and 3,840 px
You can use the Device art generator provided by Google to create nice looking mockups.
Your app icon must be a PNG or JPEG, up to 1 MB, 512 px by 512 px, and meet our design specifications and metadata policy
I typically use icon.kitchen to create my app icons. Once I’ve downloaded the assets, I then follow the instructions in this Stack Overflow answer to add the icons to my app using Android Studio.
For the first release:
flutter build ipaFor subsequent releases, run the Fastlanes:
cd iosfastlane betaIn the ios/fastlane/Appfile file, update the app_identifier, apple_id, itc_team_id, and team_id entries to match your project’s values.
Next, create an app-specific password and add it to the .env.default file in the ios/fastlane directory (source):
FASTLANE_USER=<Apple USER ID>FASTLANE_APPLE_APPLICATION_SPECIFIC_PASSWORD=<App-Specific Password>| Spec | Value |
|---|---|
| Icon Size | 1024 x 1024 px |
| Feature Graphic Size | 1024 x 500 px |
| 5.5-inch Phone Screenshot Size | 1242 x 2208 px |
| 6.5-inch Phone Screenshot Size | 1284 x 2778 px |
| 12.9-inch iPad Screenshot Size | 2048 x 2732 px |
Devices for screenshots:
App store icons should be 1024x1024 px and according to the Apple docs:
You can let the system automatically scale down your 1024x1024 px app icon to produce all other sizes
To do this, navigate to the Assets section under Runner/Runner in XCode and press the ”+” icon. Select IOS and then IOS App Icon. This will add an “AppIcon” asset to the project. You can drag a file from your finder onto one of the slots to update the launcher icon.
![]()
I use this Figma file for creating 2D mockups.
Image button in the “Fill” section on the sidebar.

This article was inspired by Creating a Chrome Extension with React a Step by Step Guide.
For the full code, check out the repo.
Use the official Create React App CLI to kickstart your project:
npx create-react-app react-chrome-ext --template typescriptcd react-chrome-extUpdate App.tsx to show a simple string:
function App() {  return (    <div className="App">      Hello World    </div>  );}
export default App;
Update index.tsx:
import React from 'react';import ReactDOM from 'react-dom/client';import App from './App';import "./App.css";
const root = document.createElement("div")root.className = "container"document.body.appendChild(root)const rootDiv = ReactDOM.createRoot(root);rootDiv.render(  <React.StrictMode>    <App />  </React.StrictMode>);
Update App.css:
.App {    color: white;    text-align: center;}
.container {    width: 15rem;    height: 15rem;    background-color: green;
}Install Webpack:
npm install --save-dev webpack webpack-cli copy-webpack-plugin css-loader ts-loader html-webpack-plugin ts-nodeCreate a webpack.config.js file at the root of the project and add the following:
const path = require("path");const HTMLPlugin = require("html-webpack-plugin");const CopyPlugin = require("copy-webpack-plugin")
module.exports = {    entry: {        index: "./src/index.tsx"    },    mode: "production",    module: {        rules: [            {              test: /\.tsx?$/,               use: [                 {                  loader: "ts-loader",                   options: {                     compilerOptions: { noEmit: false },                    }                  }],               exclude: /node_modules/,            },            {              exclude: /node_modules/,              test: /\.css$/i,               use: [                  "style-loader",                  "css-loader"               ]            },        ],    },    plugins: [        new CopyPlugin({            patterns: [                { from: "manifest.json", to: "../manifest.json" },            ],        }),        ...getHtmlPlugins(["index"]),    ],    resolve: {        extensions: [".tsx", ".ts", ".js"],    },    output: {        path: path.join(__dirname, "dist/js"),        filename: "[name].js",    },};
function getHtmlPlugins(chunks) {    return chunks.map(        (chunk) =>            new HTMLPlugin({                title: "React extension",                filename: `${chunk}.html`,                chunks: [chunk],            })    );}
Update the package.json file to have the following scripts:
"scripts": { "build": "webpack --config webpack.config.js", "watch": "webpack -w --config webpack.config.js" }Chrome extensions require one file which is the manifest.json. At the root of your project create this and add the following content:
{ "version": "1.0.0", "manifest_version": 3, "name": "React Chrome Extension", "description": "This is a Chrome extension built with React and TypeScript", "action": { "default_popup": "js/index.html", "default_title": "React Chrome Extension" }}Run npm run build to create your application in the /dist folder.
In Chrome, navigate to chrome://extensions and select “Load Unpacked”. Select the /dist directory.
You should now be able to open a page in chrome and click the extension icon in the upper right to display a big green popup. Okay, that’s a good start.
The process to create a Side Panel is fairly straightforward now that we have the basic infrastructure in place.
Since we will be using the global chrome namespace in our TypeScript project, we need to install the appropriate types:
npm i @types/chromeIn the /src directory of your project, create a background.ts file and add the following code:
chrome.runtime.onInstalled.addListener(() => {  chrome.sidePanel.setPanelBehavior({ openPanelOnActionClick: true });});
export {}First, add the sidePanel permission to the permissions list. Next, add a side_panel field with a nested default_path argument that points to your index.html file. The updated Manifest file should look like this.
{ "version": "1.0.0", "manifest_version": 3, "name": "React Chrome Extension", "description": "This is a Chrome extension built with React and TypeScript", "permissions": [ "sidePanel" ], "side_panel": { "default_path": "js/index.html" }, "background": { "service_worker": "js/background.js" }}In your webpack.config.js file, add a new line to the entry object for the background script:
entry: { index: "./src/index.tsx", background: "./src/background.ts" },Run npm run build again to update your extension.
In chrome, navigate to the chrome://extensions page again and reload the extension. Now when you click on the icon, it should open the side panel showing the same large green box.
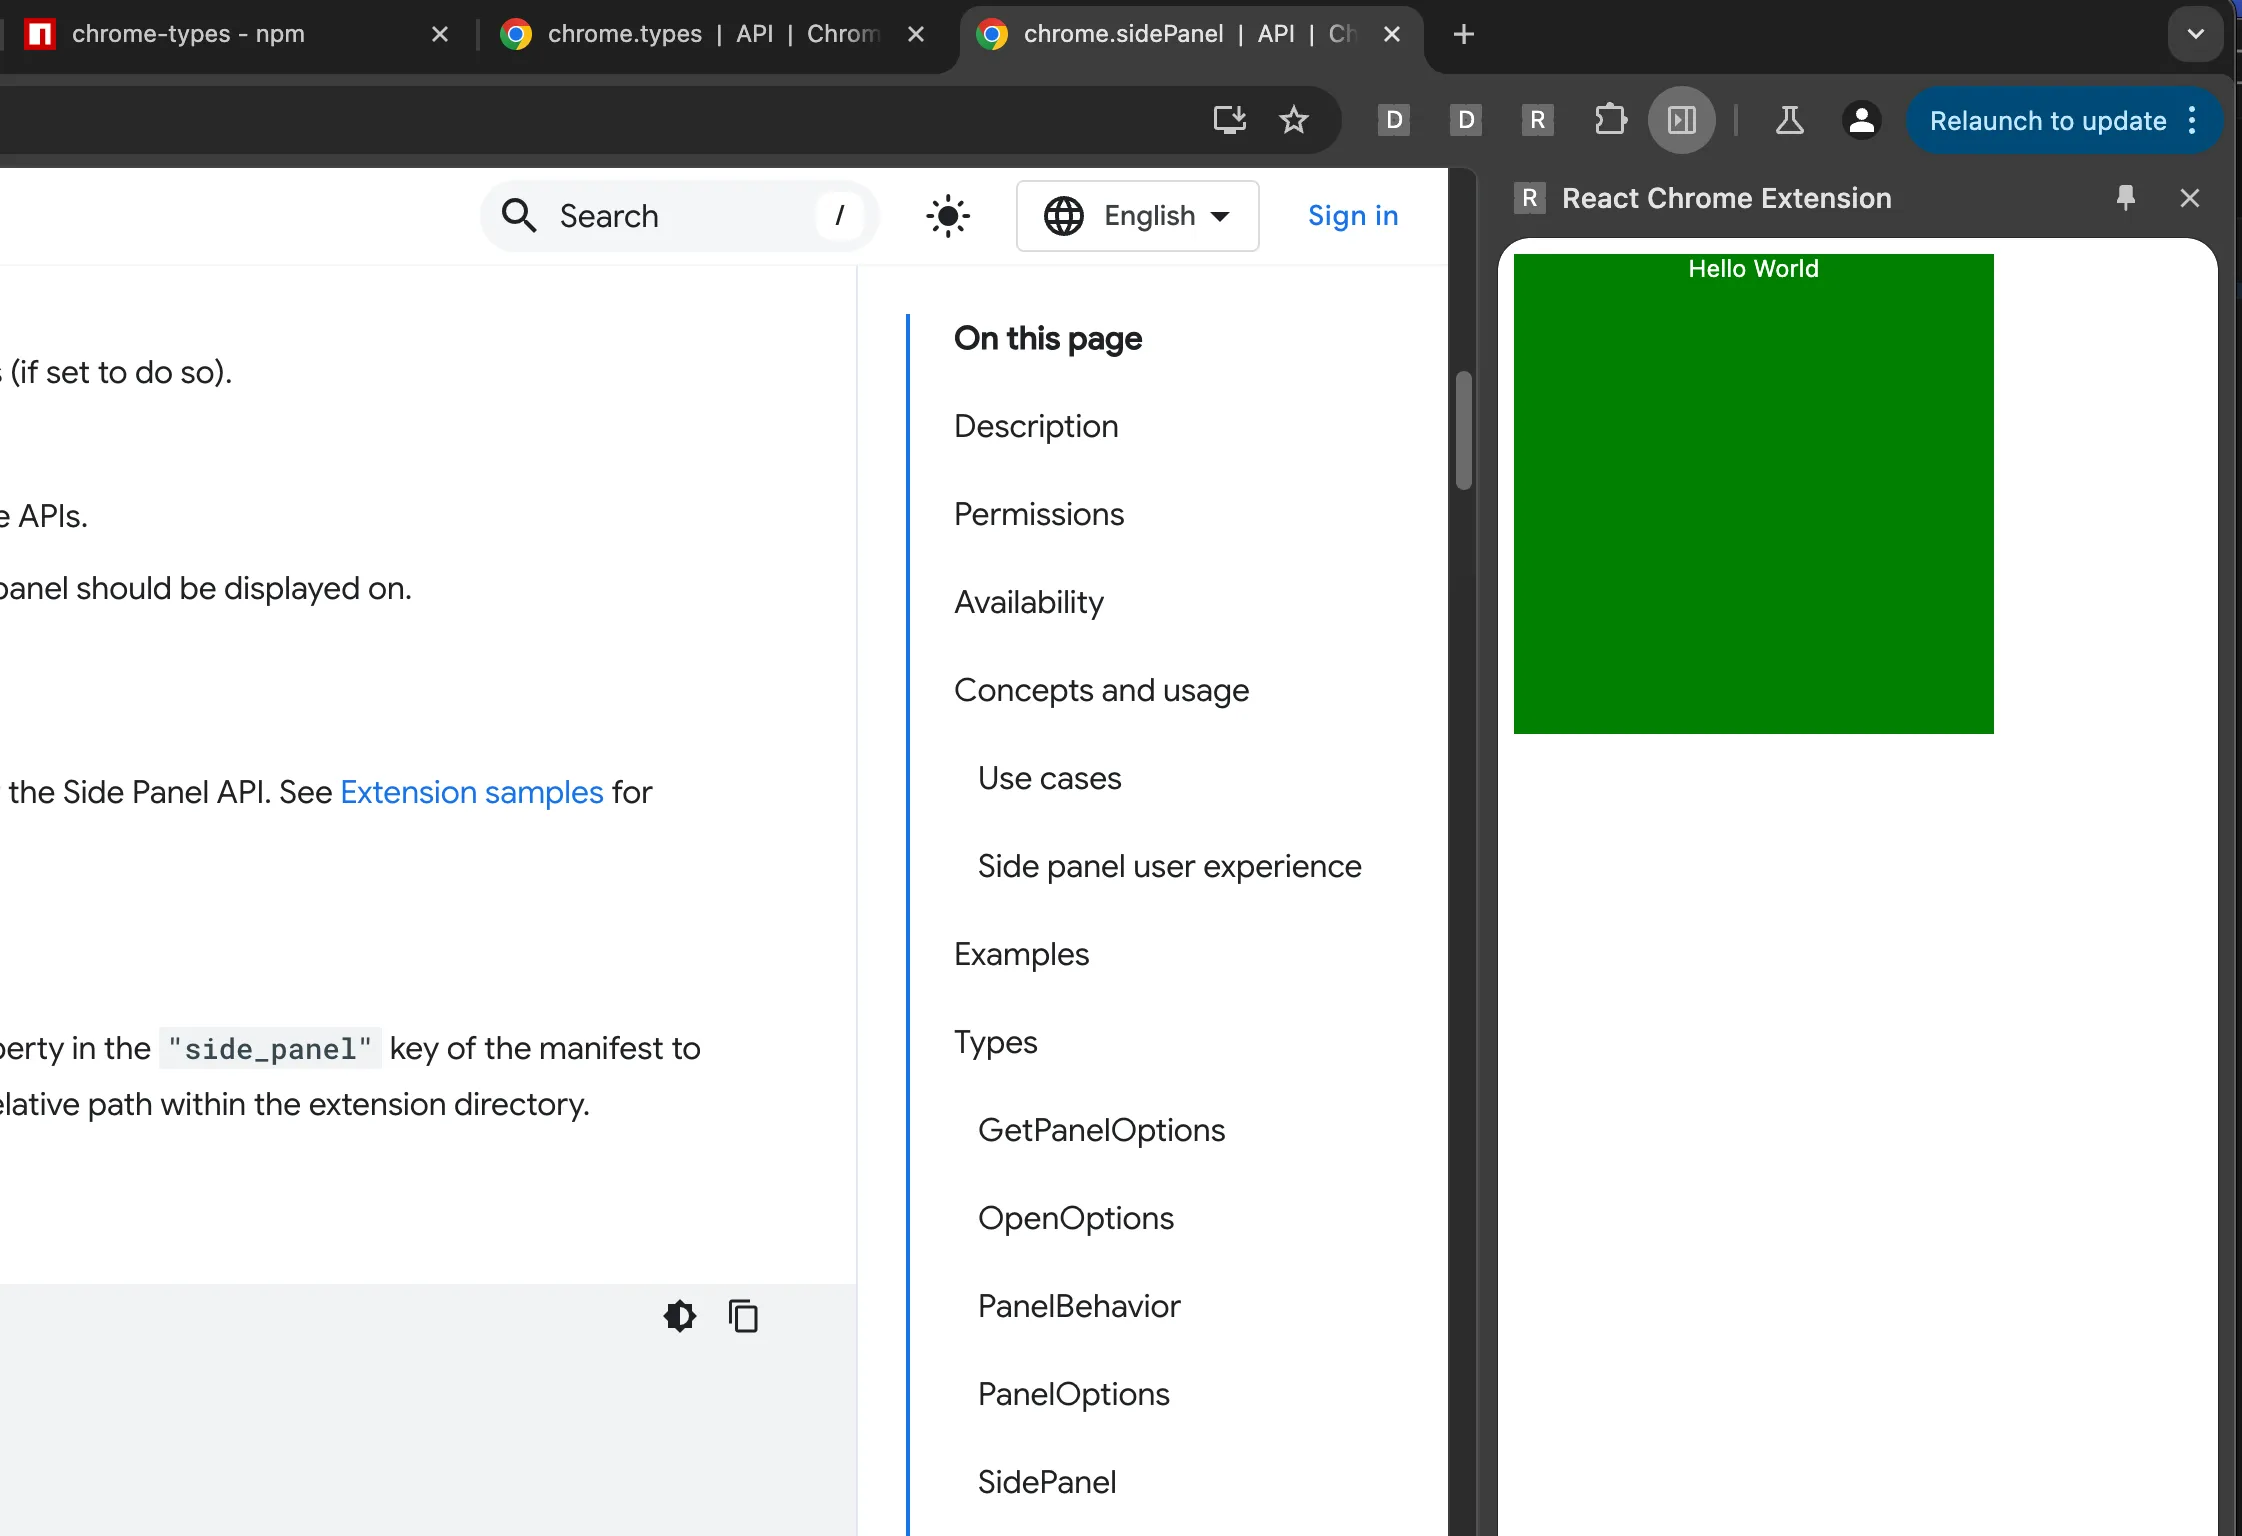
If you have opinions on how to write software, you probably feel a strong pull to organize the files of your project. Normally this is effortless but not for React Chrome extensions. If you move a file in this project, you will need to update the webpack.config.js and (sometimes) the manifest.json files to point to the correct location.
I like to put files that affect the entire app in an /app folder so I’ll move the background.ts file there.
Now that we’ve transplanted the background.ts file, we need to tell the Webpack config where to find it:
entry: { index: "./src/index.tsx", background: "./src/app/background.ts" },In this case the background.js file will still be located at the same location in the /dist folder so we odn’t have to update the manifest.json:
"background": { "service_worker": "js/background.js" }Running npm run build and refreshing the extension one more time should give us an extension that works the same as before. Clicking on the icon should open the side panel ✅
Where things get a bit more complicated is when you want to create separate React components for each part of your extension; side panel, options page, popup, etc. Just as with the background.ts file, you can move these other components anywhere but there are a few requirements to make it all work.
Each component requires two files: an index.tsx and the component file (e.g. SidePanel.tsx).
For this example, I’ll be creating my side panel component in the /src/features/side_panel/ folder.
Create an index.tsx file:
import React from 'react';import ReactDOM from 'react-dom/client';import SidePanel from './SidePanel';
const root = document.createElement("div")root.className = "container"document.body.appendChild(root)const rootDiv = ReactDOM.createRoot(root);rootDiv.render(  <React.StrictMode>    <SidePanel />  </React.StrictMode>);
Create a SidePanel.tsx file:
function SidePanel() {  return <div className="SidePanel">Side Panel</div>;}
export default SidePanel;We’ll need to update the entry field in the Webpack config to point to the new side panel index.tsx. The value you add as the key in the map will determine where in the /dist folder the files are generated:
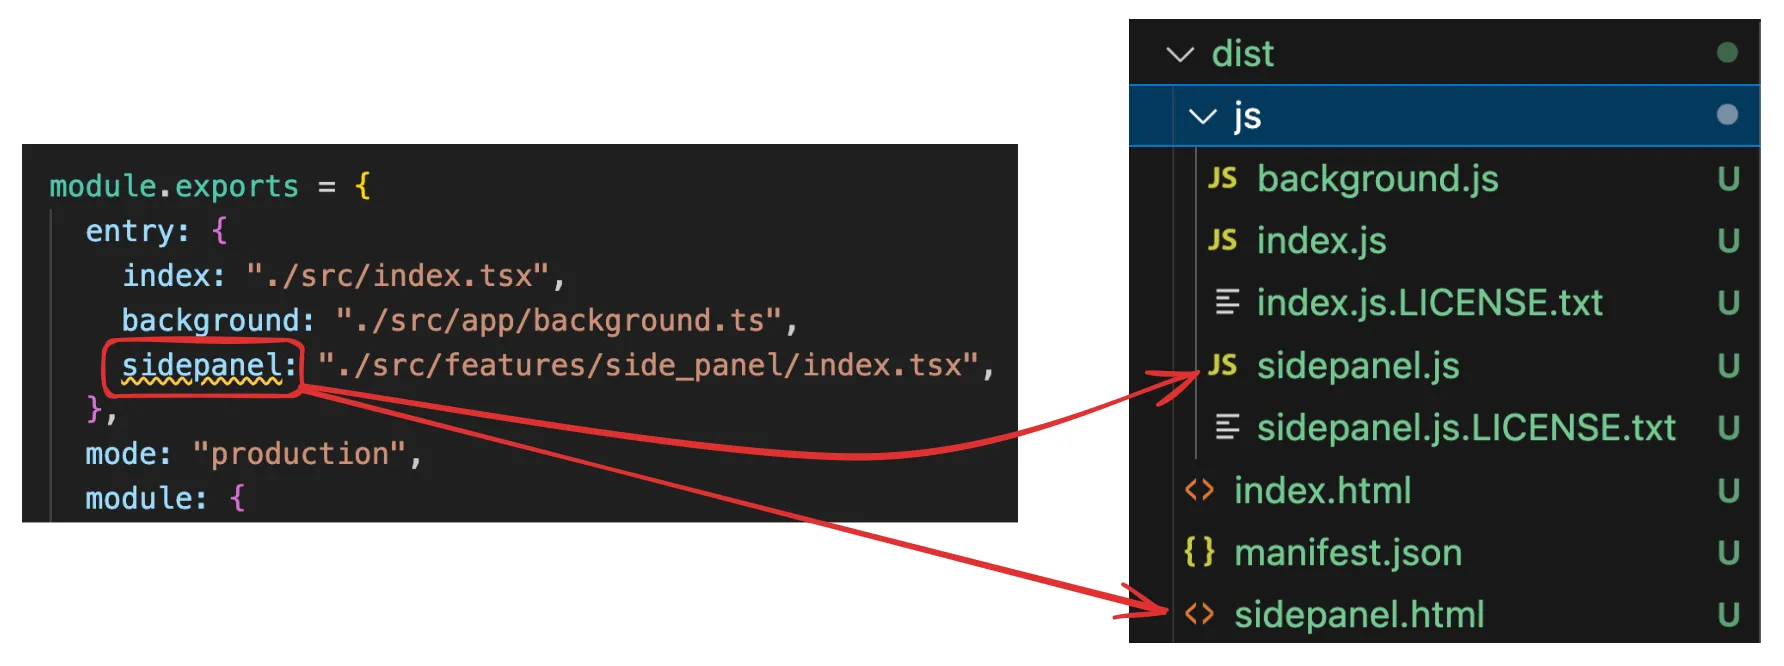
The value (on the left side) is where Webpack can find your file.
In addition to this change, you will also need to update the HTML Plugin configuration to add the sidepanel:
const path = require("path");const HTMLPlugin = require("html-webpack-plugin");const CopyPlugin = require("copy-webpack-plugin");
module.exports = {  entry: {    index: "./src/index.tsx",    background: "./src/app/background.ts",   sidepanel: "./src/features/side_panel/index.tsx",  },  mode: "production",  module: {    rules: [      {        test: /\.tsx?$/,        use: [          {            loader: "ts-loader",            options: {              compilerOptions: { noEmit: false },            },          },        ],        exclude: /node_modules/,      },      {        exclude: /node_modules/,        test: /\.css$/i,        use: ["style-loader", "css-loader"],      },    ],  },  plugins: [    new CopyPlugin({      patterns: [{ from: "manifest.json", to: "manifest.json" }], // Adjusted path    }),   ...getHtmlPlugins(["index", "sidepanel"]),  ],  resolve: {    extensions: [".tsx", ".ts", ".js"],  },  output: {    path: path.join(__dirname, "dist"),    filename: "js/[name].js",   publicPath: "/",  },};
function getHtmlPlugins(chunks) { return chunks.map( (chunk) => new HTMLPlugin({ title: "React extension", filename: `${chunk}.html`, chunks: [chunk], }) );}Now that we’ve created a new sidepanel.html file in the /dist folder, we can use it in the manifest.json:
{ "version": "1.0.0", "manifest_version": 3, "name": "React Chrome Extension", "description": "This is a Chrome extension built with React and TypeScript", "permissions": [ "sidePanel" ], "side_panel": { "default_path": "sidepanel.html" }, "background": { "service_worker": "js/background.js" }}Run npm run build one more time and reload the extension. Clicking on the extension icon should again open up the sidebar with the big green box, only this time you have a custom folder structure under the hood.
You can expand on this to add separate components for the Options page and Popup.
Since each component we’ve created runs in a separate context, we need to be creative with how they communicate with one another. One way to pass realtime data between them is using Chrome’s Messaging API.
In this example, I will be having my Options.tsx component send data to my SidePanel.tsx component. Here is the Options.tsx:
function Options() {  const sendMessage = () => {    chrome.runtime.sendMessage(      { type: "UPDATE_FROM_OPTIONS", payload: "Hello SidePanel" },      (response) => {        console.log("Response from SidePanel:", response);      }    );  };
  return (    <div className="App">      Options      <button onClick={sendMessage}>Send Message to SidePanel</button>    </div>  );}
export default Options;To receive the message, my SidePanel.tsx file will listen for all messages sent using chrome.runtime. Here is the SidePanel.tsx:
function SidePanel() {  useEffect(() => {    chrome.runtime.onMessage.addListener((message, sender, sendResponse) => {      if (message.type === "UPDATE_FROM_OPTIONS") {        // Handle the message        console.log("Received message in SidePanel:", message.payload);        sendResponse({ status: "Received by SidePanel" });      }    });  }, []);
  return <div className="App">Side Panel</div>;}
export default SidePanel;After reloading the extension, first open the side panel by clicking on the extension icon. Then, right-click the icon and open the options page. From here, you should be able to press the button and send a message to the side panel (to see the console message, right click in the side panel and select “inspect”).
If you need to mediate messages between components, use the background script:
// In background.tschrome.runtime.onMessage.addListener((message, sender, sendResponse) => { if (message.type === 'UPDATE_FROM_OPTIONS') { // Forward the message to SidePanel chrome.runtime.sendMessage(message, (response) => { sendResponse(response); }); return true; // Keep the messaging channel open for sendResponse }});Messages sent using the Messages API are transient so if your extension requires more persistent data storage, you can use Chrome’s Storage API. Here’s a brief example:
// In Options.tsxchrome.storage.local.set({ sharedData: 'Some data' }, () => {  console.log('Data is set in storage');});
// In SidePanel.tsxchrome.storage.local.get(['sharedData'], (result) => { console.log('Data retrieved from storage:', result.sharedData);});To use TailwindCSS throughout your extension follow these steps.
npm install -D tailwindcss postcss autoprefixerRun the following command to generate tailwind.config.js and postcss.config.js files at the root of your project:
npx tailwindcss init -pEnsure the tailwind.config.js file can find your source files:
/** @type {import('tailwindcss').Config} */module.exports = { content: [ "./src/**/*.{js,jsx,ts,tsx,html}", // Adjust this path based on your project structure ], theme: { extend: {}, }, plugins: [],};In your App.css file, add the Tailwind styes:
@tailwind base;@tailwind components;@tailwind utilities;Finally, add the postcss-loader to the css module in the webpack.config.js file:
module: { rules: [ // TypeScript loader { test: /\.tsx?$/, use: 'ts-loader', exclude: /node_modules/, }, // CSS and PostCSS loader { test: /\.css$/i, use: ['style-loader', 'css-loader', 'postcss-loader'], }, ], },The code I shared above is already using the App.css file but if you add the Tailwind styles to a different file, you’ll need to add that as an import in each index.tsx file. For example:
import React from 'react';import ReactDOM from 'react-dom/client';import '../../tailwind.css'; // Import Tailwind CSSimport Options from './Options';
const root = document.createElement('div');root.className = 'container';document.body.appendChild(root);const rootDiv = ReactDOM.createRoot(root);rootDiv.render( <React.StrictMode> <Options /> </React.StrictMode>);With this setup, you should be able to build robust Chrome extensions using the React framework and TailwindCSS. Happy coding ☕️
Enums were good. Now they’re great.
Flutter 3.0 was announced at Google IO yesterday and as can be expected from a major version jump, there were a lot of new features to dig through. A few of the big ones:
You can read more about the full release in the announcement here and if you’re someone that wants to see everything that was added, check out the release notes.
The feature that excited me the most didn’t quite make it into the announcement articles, though. Flutter 3.0* also shipped with full support for enhanced enums, meaning that your enums can now behave like mini-classes with members and methods.
Before now, enums were extremely simple — basically just lists of values. If you wanted to make them more useful, you’d need to extend them using the extension syntax. Not too difficult but not too convenient, either.
With enhanced enums, everything can be packed into the enum itself — and that’s awesome.
* Technically speaking, enhanced enums are a Dart 2.17.0 feature. That’s why they were in the Dart announcement and not the Flutter announcement…but either way…
My app, FitJo, has an enum called “Metric” that contains all the possible body-related metrics a user can track in the app. Simple, right? Not quite. Different metrics track different types of units.
To address this, I created an enum extension with a giant, ugly switch statement that let me know what type each metric was.
After migrating to the enhanced enums structure, the above monstrosity looks like this:
From 64 lines to 26!
This Stack Overflow answer provides some more details on everything that’s possible with enhanced enums so check it out if you’re interested.
In addition to reducing the overall lines of code cluttering your project, enhanced enums seem like the ideal solution for a number of different problems.
Say you have a backend with a fixed list of available endpoints. You could set up an enum for each endpoint that includes fields for the URL pathway and the API version.
If your app lets users set up social profiles, you could create an enhanced enum for all potential social platforms. Each enum would have the name of the platform (Twitter), the URL prefix that goes before the username (https://twitter.com/),,) the icon that should be displayed (Icons.twitter), and the tooltip text that will appear when a user hovers over the icon (‘Twitter’).
For subscription apps, you may want an enum that contains all the features a subscription will unlock. Each enhanced enum would have the name of the feature, a short description, and an image asset path. When a non-paying member stumbles across your offerings page, you can cycle through the Feature.values enum list and show them what they’re missing.
Happy coding!
Purpose is a logic driven concept, one that can only be grasped by an entity with the potential to understand nebulous abstractions like reason and meaning. In simple terms, purpose is the “why” behind the “what” and it deals with questions that exist outside the plane of physical material. Objects in and of themselves are not concerned with the “why”. A rock in the middle of the desert does not care, nor have the capacity to care, about why it is destined to bake in a spotlight of solar radiation until the sun burns out. This goes for all things that have no means of deliberately responding to their environments - rocks, water droplets, the metal carcass of an old car. No, these things exist in a realm that is indifferent to any underlying, supernatural force…or so it seems.
Above these inanimate space-fillers, there are the creatures that can deliberately respond to their environments, injecting intention into their actions while still being unaware of the purpose-oriented “why”. I make this disclaimer because acting with intent suggests the presence of a “why”, but in the case of animals and plants the “why” deals exclusively with the interaction between “whats”. It is a primal, instinctively “why”. Hide here so you are not torn apart by the stalking predator. Navigate to the river so you can drink and stay hydrated. Grow towards the light to maximize your energy intake. These behaviors are curious, though. While not directly purpose-driven, they are adventitiously necessary for the discovery of the purpose I have been referencing in my previous posts. How does rabbit know that escaping the coyote is preferable to embracing it’s gory demise? I think this is one of the most formidable pieces of the argument that purpose exists. The natural world, in all of its mysterious and gargantuan glory, has consistently integrated survival into it’s design. Can we then rely on the superior intelligence of the universe to claim that real purpose is credible? In other words, we exist now because there is a force in the universe around us that has been attempting to stay alive since it originated. To claim there is no purpose would mean to maniacally value our limited intelligence over that of the machine that we are a part of…I’m off on a bit of a tangent.
Returning to the arc of this post, it takes a particular awareness of mind to even consider purpose and humans seem to be the only thing we know of that have this awareness. Less than that, purpose is driven by logic which is a product of mental exercise and so…maximizing our ability to pursue this purpose means maximizing our ability to think, mull, mentally wrestle with ideas and master logical constructions. It does not matter so much what our physical capabilities are, but rather how our physical bodies support our aptitude for thought.
Nonetheless, we cannot ignore the fact that we are physical beings that exist in the world of “whats”. I’d like to establish now that purpose cannot be uncovered in the tangible alone meerly because analysis of the tangible requires a critical outside perspective. A perspective that can evaluate things, make comparisons, form ideas about what is observed. In that case, maybe purpose can exist among physical objects but it can never be known without a conscious third party. Our minds then, act as a portal through which we can explore the wasteland of “whys” and annotate the interactions of objects around us. It is the vessel that gives those interactions any importance at all. What we then have to hope is that the ability to think was not an accidental development. If it was, well maybe we’re adding flavor to a meal designed for beings without taste buds…or something like that.
If it wasn’t an accident though, the ability to think is the greatest gift we could have received and likewise our only tool for discovering a greater purpose. I’d ask you to THINK about how you would pursue purpose without the ability to THINK but that would be a fruitless drill.
So how do we maximize our ability to think?
Optimization of these components is essential to reaching the furthest conclusion you can possibly reach, for reaching the deepest depths of the philosophical rabbit hole. In its purest form, it is simply a calculation of effective rate x time. Of course, there is a dynamic and vivacious interplay between all of these components that I am not fully considering now but the point is that optimizing one will not produce as significant results as if you had optimized 2 or 3 or 5 of them. I’m sure there are other factors I have overlooked too and I will add them as I think of them but this list is a sufficient launching point. Next, I will elaborate on each of these items (and link each post to the related bullet point).